Stories of bicycle travellers & free weblogs for biketravellers!
Manual
Danger zones and weapons on a biketravellers trip through the Americas
Aug 21st
One upcoming biketraveller from Canada got worried about what would happen with him and his friend once crossing into Mexico. He was considering bringing a gun because of all the bad stories he has heard. I would like to share my responses to him here.
My first reaction (other reacted as well, in a similar way):
Don’t believe the hype. Unless you want to sell or buy a kilo of drugs, you should not get involved in any drugs violence. We crossed in Tijuana (cycling the regular highway in) and stayed a few days there with some Couch Surfers. We visited the nice market, the beach, the border, a great new museum (one of the very few in our entire trip J) and no problems at all.
Only problem is traffic as it is busy until after Ensenada (and every now and then some oversized US SUV that zooms past too close in the rest of Baja).
Don’t think about bringing a gun. Just think about what will happen with it:
– You will get checked at one of the hundreds of checkpoints you will see: you will end up in jail
– You will use it: you will end up in jail
– It must be More >
Automatic sign-ups disabled, please email for your free blog!
Dec 8th
Dear BikeTravellers,
You have arrived here because you typed an incorrect blog address or you want to open a free blog yourself!
As there had been too many spam blogs, with advertisements for sporting goods or much worse, we have disabled the automatic registration, so we can keep the community free of spam
But the free BikeTravellers blogs are still available, just send a message by email (info@) or through the contact form with the following info:
- Your name and email address
- Your desired username, so you can start commenting, posting on the forums, edit BicPedia etc.
- Your desired blogname if you want a blog as well: yourname.biketravellers.com -> just to be clear, you can choose ‘yourname’ 🙂 (and you can even use your own domain.com if you have one, see the instructions here.
Looking forward to reading your stories!
New feature: use your own domain.com on your free BikeTravellers blog!
Oct 25th
Of course it is very nice to have your own free Coolname.BikeTravellers.com blog, but maybe you already had a shorter or more descriptive domain name, like http://WorldOnaBike.com.
Good news! We have enabled the possibility to add your own domain now.
This means you can still register a free blog, like coolname.biketravellers.com but the URL (the part you see in the address bar of your browser) could be coolname.com or any other domain you would like to use (so you can loose the nice but interesting ‘biketravellers’ part).
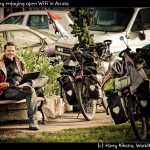
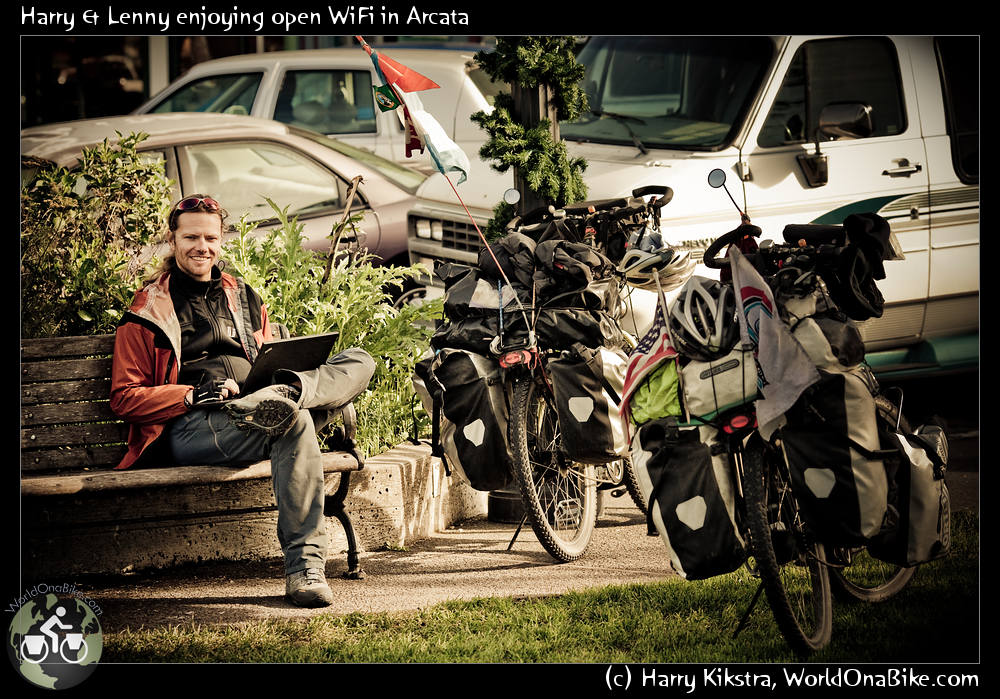
Harry uses free WiFi to update his blog WorldOnaBike.com, from Alaska to Ushuaia on a bicycle.
The example above (http://WorldOnaBike.com), works like that: the original blog address was http://harry.biketravellers.com, but WorldOnaBike.com was easier to share and to remember! Note that the original address still works, it will redirect automatically, so you do not have to worry if your old address is already ‘out there’.
There are a few things you need to do in order to use this service:
- Of course, first register a free blog, like coolname.biketravellers.com
- Register any domain at any of the main registrars, for example from Dotster.com or GoDaddy.com or Networksolutions.com in the USA or 123-reg – the UK’s No. 1.. This can be any .com. net .nl or whatever domain.
- Once your registration More >
The new BikeTravellers.com community
Oct 14th
You might have noticed a few changes already 🙂
After some testing, we have added the community features to BikeTravellers.com. What does this mean for you and your blog?
Your blog is still the same (yourname.biketravellers.com), so nothing changes there. You might only notice a new adminstration bar on top, with links to your new profile, your blogs and more. Check it out!
- On the new homepage a lot has changed: you can now see the latest posts of all bikebloggers, the latest comments and much more.
- There are now links to lists of blogs, users, forums and more, check out the menu above.
- You can become ‘friends’ with other biketravellers, and can send private instant messages, write on their ‘wire’ (like the Facebook ‘wall’) and much more
- We have added forums and groups, so you can discuss with other users about specific subjects. You can add as many groups and forums as you want!
- You can even add a groupblog to your group, where all members can post.
- You can add Avatars/logos to your profile, groups, forums etc, all with just a few clicks.
More features will be added and I have not even described the current ones here, so check out the new Biketravellers.com, your profile and More >
How to get sponsoring for a bicycle trip?
Sep 1st
Last week, I received the following question by email:
I’m starting a solo trip in May from Alaska to Argentina. I’m using this trip not only for my own desires, but to raise awareness and funds for an organization that aims at putting an end to factory farming and animal abuse in said farms.
I’m only at the beginning stages of preparation at this point. I noticed you have obtained sponsors for your trip. This is something I’m very interested in, as I have very limited resources and can use all the help I can get. I’m here to ask you for advice on how to obtain sponsorship. If you could give me some help as to how you went about getting sponsors, it would be greatly appreciated.
I replied the following, which might be helpful for others:
Thanks for your email. Great you are going to do it. I am not sure if you already have a blog, but you can open one for free at http://BikeTravellers.com. About the Sponsoring: do not get your hopes up too high. Basically I got sponsored, because I am already a well-known (published) writer, climber and photographer. Still many, many more said no and financial support is More >
New BikeTravellers T-shirts: Pretty & useful :)
Jan 10th
Ok, you have made the selection and chose your 2-3 shirts for the road. But why those ones? Because they make you look cool/young/sexy or all of the above? Because they are (not) cotton and lightweight?
As a BikeTraveller you need to combine functionality as much as possible, so you can minimize the stuff you are carrying. So what better way to be dressed and get attention from potential hosts than get a specialized BikeTravellers t-shirt!
They are not just pretty (you can still customize them and choose the colour, size, fabric, quality), but will also help you, as the message is clear:
– “Will Stop/Talks for Pasta” will tell others that the beter have a big portion ready if they want you to talk about your adventures!
– “Make Miles not War”, “1500 MPG (and that’s just for my stove)” & Reall? (gas prices went up again?) will tell everybody, how you think & feel about SUV’s and other gas guzzlers!. Spread the word and help yourself start some good conversations and likely get invited to stay for dinner 🙂
In this little flash panel below, you can see a sample of our new BikeTravellers T-shirts. They are not just beautiful (you can still choose More >
100 new themes added
Nov 8th
The theme is what determines how your site looks, the layout, colours etc. We just added and/or upgraded 100 themes, so now you can choose over 120 themes when signing up for a Biketravellers.com blog.
Most themes are even further customizable, for example you can change the colours, header image. Of course you can also add, move or delete the many available widgets, the small blocks of infrmation on the sidebar. You can try out every theme you like and if you don’t want it anymore? Then you can change (back) with just one click, all your posts are saved, they will just look differently 🙂
How do you use your new blog?
Nov 2nd
All BikeTravellers are powered by the Open Source WordPress system, but we have already done the installation for you! WordPress is packed with many amazing features. So now that you’ve got it installed, what should you do? These are the instructions as also to be found on the WordPress site (all links will lead you to the detailed info on the WordPress.org site.)
Let’s take a step-by-step tour through your WordPress site and learn about how all the different functions work and how to make your new site your own.
Starting from the TopBegin by logging into the Administration Panel. This is the brain behind your website, the place where you can let your creativity explode, writing brilliant prose and designing the best and most lovely website possible. This is where the organization of your site begins – and this is just the start. You can use the “Admin Bar” you see on top or can always type: yourblog.biketravellers.com/wp-admin.php
From the Administration Panel, from the top of the screen menu choose View Site. Like it? Don’t like it? Doesn’t matter, just look at it. This is where you are going to be spending a lot of time over the next few minutes, hours, More >
Video tutorials for new bloggers
Sep 30th
So you opened your new blog, turned on the anti-spam plugin and now what? How do you write a page, change your theme etc? You can just try out a lot of things by going in your admin menu (yourname.biketravellers.com/wp-admin) and browsing through the different menu options.
You can also check out this excellent overview of video instructions for those of you that like a bit more guidance.


Recent Comments